Friday, March 23, 2012
Time for a change
Sorry I have been absent. I have written several posts but have come to find out that my daughter is exhibiting signs of celiac's disease. So I am going to put this blog on hold for about a week longer, and then I will be back with hopefully awesome paleo recipes.
Thursday, March 8, 2012
Fresh made salsa verde (it looks hard, but was really easy. I promise)
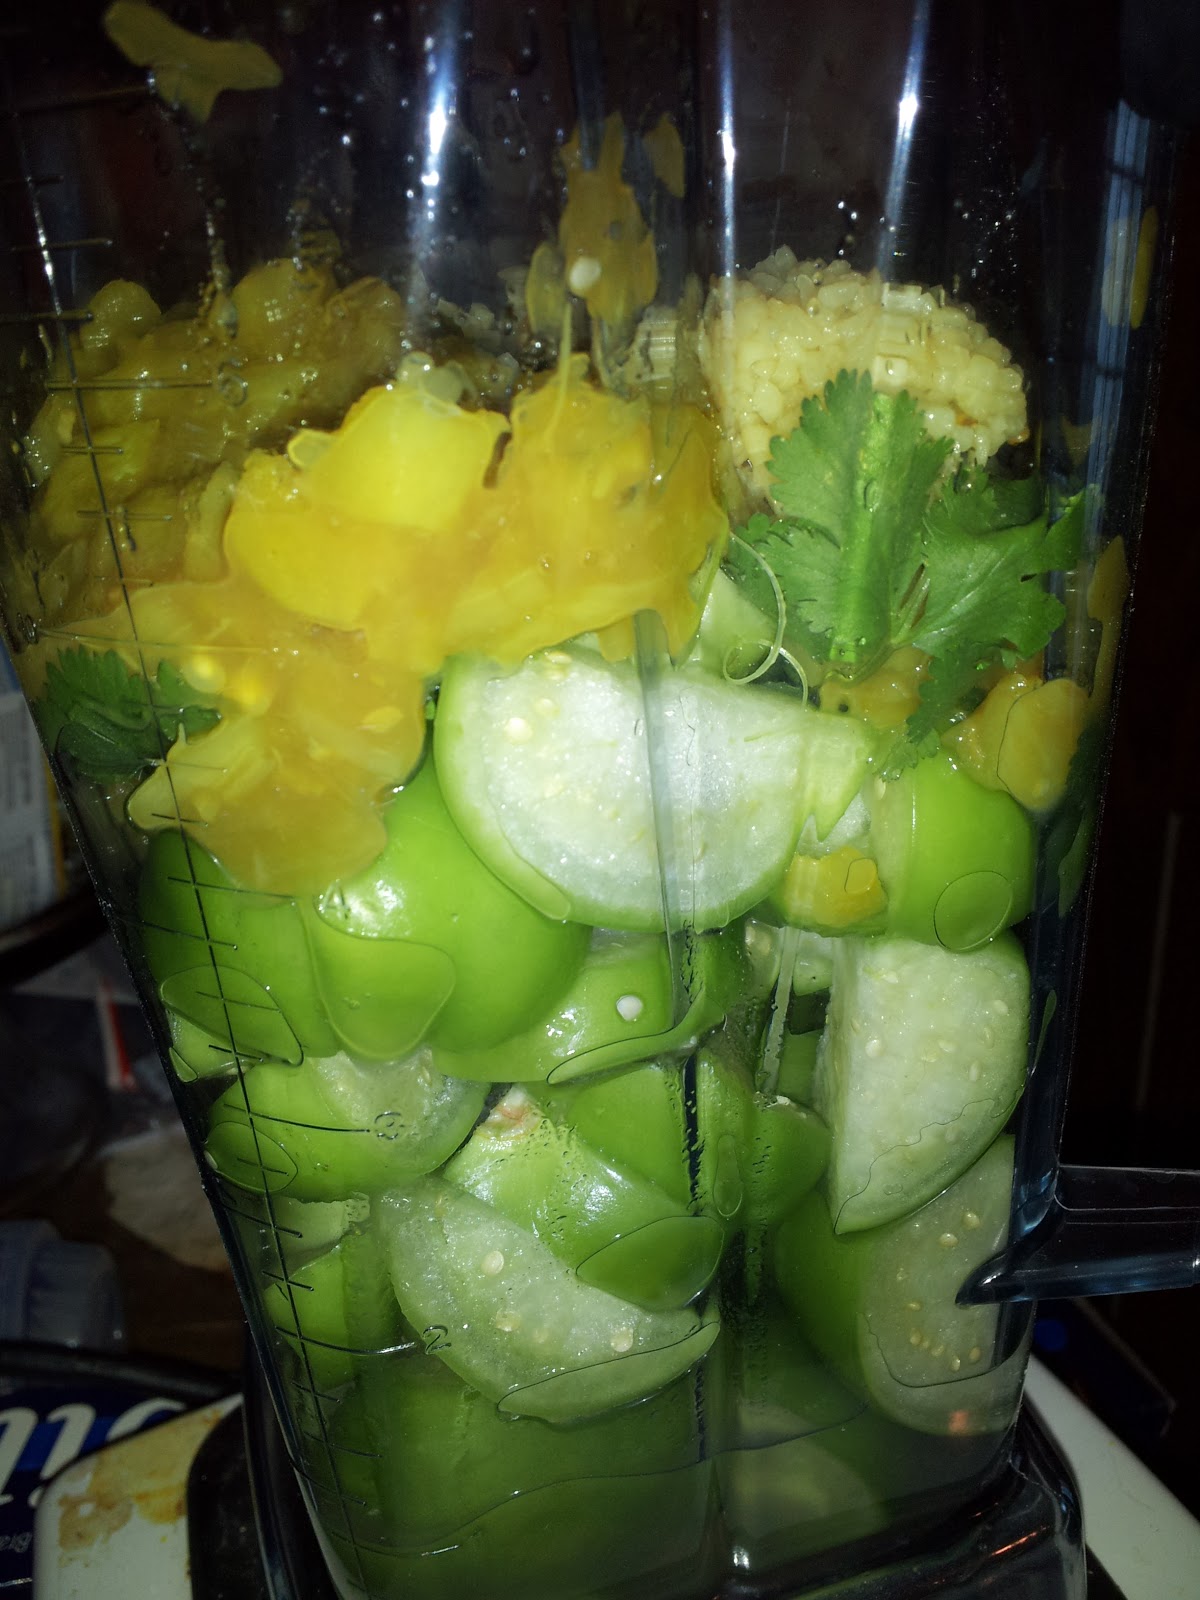
So last night I did the chicken taco meat in the crockpot and decided I wanted salsa verde with it. I mean, chicken tacos NEED lime juice and salsa verde. I felt icky, and seriously looked at the pre-made jars. The price was low, the effort... beyond minimal. Pop the jar open and spoon some out. I mean come on, what is not to love. Then I remembered. The taste is not there, the fresh ingredients, not there. So I sucked it up and made enough to can. Do NOT freak out. Canning is painfully easy. I recommend buying the ball canning kit, the big book of canning for Ball and checking out http://www.pickyourown.org/ . This website is a wonderful resource for what you can and can not do, how to find places to pick fruits, and veggies how to grow them, and so much more. If you have EVER thought about canning your own stuff, this is a good place to get info.
So I made this :
So what do YOU need to make fabulous easy home made salsa verde? It sounds like a lot, but it is not. and this makes a LOT. But you can freeze it or can it and it is great and so fresh when you open it back up.
Ingredients:
2 Pounds of Tomatillos ( take the husks off) sliced or quartered
1 onion ( cut into chunks)
2 teaspoons of garlic.
2 small cans of green chilies ( or serano) I used Trader Joe's fire roasted style
4 tablespoons of cilantro ( fresh if possible)
2 tablespoons of oregano ( or up the cilantro)
1 teaspoon of cumin
2 chicken bullion cubes ( optional)
2 teaspoons of salt ( to taste)
1 cup of vinegar
juice of 2 limes ( or about 1/3 cup of lemon or lime juice concentrate)

I know.... it looks overwhelming. But it is not. The hardest part is trying to explain to your three year old that those are NOT apples and to please not run off with them to try to eat them. We eat a lot of granny smith apples in this house. Then you have to remove the limes from his little hands and tell him that he may have an orange, but these are not oranges. Then try to ignore the wails from your sick child as you follow these easy directions.
So first husk, dehusk?, whatever to the tomatillos. Then cut them into quarters or slices. Whatever makes you happy. Cut the onion into manageable chunks as well. I have a BIG blender so I was able to do this in two batches. Anyway you blend your tomatillos, cilantro, onion, garlic and some vinegar then add it to your large pot that you have a lid for.
 After you blend it add the rest of your ingredients ( lime, salt, oregano, bullion, and cumin). Bring it to a boil then lower the temperature, cover and let it simmer for about 15 minutes.

Now. if you are going to can it put it in your warm ( sterilized) jars. Fill to about 1/4 inch from the top. Wipe rims put the new ( sterilized/boiled/dishwashered) lids on and finger tighten the rings. Process in a boiling water bath for 15 minutes then set out so they can cool off.

A tip for juicing limes ( or lemons) is to roll them on the counter for a few minutes ( use pressure) and then cut them and squeeze them. If you have any questions about what I did here, please feel free to ask in the comments below... I would be excited to know that people actually look at this blog. This salsa also freezes beautifully. Just be sure it it totally cooled off before you put it in the freezer.
This is a recipe that I would trust my seven year old to do the majority of. She can cut veggies and measure alone. I would be present for the boiling because it will splatter. If you try it, let me know how it turns out.
So I made this :
 |
| Are you jealous yet? |
Ingredients:
2 Pounds of Tomatillos ( take the husks off) sliced or quartered
1 onion ( cut into chunks)
2 teaspoons of garlic.
2 small cans of green chilies ( or serano) I used Trader Joe's fire roasted style
4 tablespoons of cilantro ( fresh if possible)
2 tablespoons of oregano ( or up the cilantro)
1 teaspoon of cumin
2 chicken bullion cubes ( optional)
2 teaspoons of salt ( to taste)
1 cup of vinegar
juice of 2 limes ( or about 1/3 cup of lemon or lime juice concentrate)

I know.... it looks overwhelming. But it is not. The hardest part is trying to explain to your three year old that those are NOT apples and to please not run off with them to try to eat them. We eat a lot of granny smith apples in this house. Then you have to remove the limes from his little hands and tell him that he may have an orange, but these are not oranges. Then try to ignore the wails from your sick child as you follow these easy directions.
So first husk, dehusk?, whatever to the tomatillos. Then cut them into quarters or slices. Whatever makes you happy. Cut the onion into manageable chunks as well. I have a BIG blender so I was able to do this in two batches. Anyway you blend your tomatillos, cilantro, onion, garlic and some vinegar then add it to your large pot that you have a lid for.
 | |||
| Its kind of pretty. |


Now. if you are going to can it put it in your warm ( sterilized) jars. Fill to about 1/4 inch from the top. Wipe rims put the new ( sterilized/boiled/dishwashered) lids on and finger tighten the rings. Process in a boiling water bath for 15 minutes then set out so they can cool off.

A tip for juicing limes ( or lemons) is to roll them on the counter for a few minutes ( use pressure) and then cut them and squeeze them. If you have any questions about what I did here, please feel free to ask in the comments below... I would be excited to know that people actually look at this blog. This salsa also freezes beautifully. Just be sure it it totally cooled off before you put it in the freezer.
This is a recipe that I would trust my seven year old to do the majority of. She can cut veggies and measure alone. I would be present for the boiling because it will splatter. If you try it, let me know how it turns out.
Wednesday, March 7, 2012
Did ya miss me?! Chicken Taco meat
So I have a new computer. It is a MacBook Pro. I really like it a lot. I am cooking again, and am ready to start sharing it with you.
I have been really really sick lately. And I have been craving GOOD Mexican food. I lived in McAllen Texas for a year of so when Ivy was a baby. I didn't speak enough Spanish and it was hard, but MAN WAS THE FOOD GREAT! I have been wanting tacos like you get at the street stands when you cross the border into Mexico. Its a little too far to drive so I decided to make my own chicken in the crock pot. I am so stuffed I can't really smell anything, but sometimes I get a whiff of it and wow! Usually I would mix the seasoning and cut all the veggies myself. But I just want to sleep. So I cheated today and used pre-made stuff.
Ingredients:
1 packet of taco seasoning
1 container of pico de gallo
2 pounds of chicken (breast or thighs)
1/2 cup of water
1/2 cup of olive oil

 Sprinkle the taco seasoning in the bottom of your crock.
Put your chicken on top and turn it over to get it on both sides of the chicken.
 Then dump your pico de gallo on top of the chicken.
 Add your oil and water by pouring it on top of the pico.
Let it cook on low for five to six hours.
 It will look like this when it is done. Shred it up and put it back in the liquid and set it on warm for another hour.


You can cut it in half if you want to. I made so much because I like to freeze it and half extra for other meals later.
We had chicken tacos. I will be turning the rest into taquitos later this week and freezing them for duty day dinners. I made home made salsa verde to go with it ( I will post it tomorrow) and served it with refried beans and corn and salad. My kids ate it all and asked for seconds. SECONDS!!! Can you believe it?!
My son is sick as well. He made cooking hard today, and then he tried to help. I am so very lucky to have such wonderful kids. Also the hubbs said you should make this. You should make it today!
I have been really really sick lately. And I have been craving GOOD Mexican food. I lived in McAllen Texas for a year of so when Ivy was a baby. I didn't speak enough Spanish and it was hard, but MAN WAS THE FOOD GREAT! I have been wanting tacos like you get at the street stands when you cross the border into Mexico. Its a little too far to drive so I decided to make my own chicken in the crock pot. I am so stuffed I can't really smell anything, but sometimes I get a whiff of it and wow! Usually I would mix the seasoning and cut all the veggies myself. But I just want to sleep. So I cheated today and used pre-made stuff.
Ingredients:
1 packet of taco seasoning
1 container of pico de gallo
2 pounds of chicken (breast or thighs)
1/2 cup of water
1/2 cup of olive oil


Put your chicken on top and turn it over to get it on both sides of the chicken.


Let it cook on low for five to six hours.


You can cut it in half if you want to. I made so much because I like to freeze it and half extra for other meals later.
We had chicken tacos. I will be turning the rest into taquitos later this week and freezing them for duty day dinners. I made home made salsa verde to go with it ( I will post it tomorrow) and served it with refried beans and corn and salad. My kids ate it all and asked for seconds. SECONDS!!! Can you believe it?!
My son is sick as well. He made cooking hard today, and then he tried to help. I am so very lucky to have such wonderful kids. Also the hubbs said you should make this. You should make it today!
Friday, January 20, 2012
That will teach me...
So my laptop has pretty much died. I will be getting a new on early next month. BUT I can not post pictures. I will be taking pictures and as soon as I can I will post a boat load or recipes. I am sorry guys.
Sunday, January 15, 2012
Where have I been?
So, I have been really busy and not been posting. Sorry guys. I will get back to it tomorrow. My mom is in town, and I have been hanging out with her and forgetting to take pictures of any of the things I have been cooking. BAD GIRL!! Sorry guys. I promise I will start doing better. Next week I will be making some easy meals, but will still share them.
Tuesday, January 10, 2012
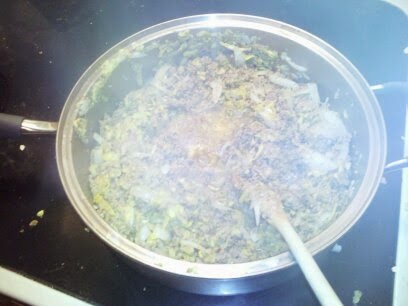
Zuppa Toscana in the crock pot
My mom came into town. I think it is impossible to travel with out feeling like you have been beaten with a stick. We love Olive Garden, and wanted something that was not too heavy. So I made Zuppa Toscana. in my crock pot. If you have never had it... you are missing out. It is basically Italian potato soup. And it is wonderful!
I was not good about taking pictures today. I went to a few different stores and just sort of hung out. Then I remembered my family thinks I need to feed them every day.... Seriously, it's like I am the mom or something.
My husband asks me what is for dinner sometimes. I am thinking about printing this, framing it, and hanging it in my kitchen.

That is how I felt today. That is how I feel every day. MWAHAHAHAHAHA Anyway. Even though I was bad and took almost no pictures I think it is pretty easy anyway. It is super. And I used ground beef that I cooked the other day and froze. I like to do that because then I have all sorts of stuff to make dinner easier when I have no idea what to make and I need something fast. Pre cooked ground beef is awesome if you want to make pasta, or pizza, or even sloppy joe's, or this soup.
What you need:
2 cloves minced garlic
2 cups chopped Kale or Swiss Chard
2 cans Chicken Broth
1 qt. Water
1 cup Heavy Whipping Cream
1 lb. Italian Sausage or ground beef cooked and drained.
2 large Russet Baking Potatoes sliced in 1/4 inch slices
1 chopped large Onion
1 small bag of Real Bacon Bits
grated Parmesan cheese.
Salt and pepper to taste
What you do:
Slice your potatoes and place them in your crock pot. Add your garlic and onion then the water and broth. Cook on low for 6-8 hours or high for 4-5. The last hour add your bacon bits, whipping cream, and kale. Turn on high and cook for the last hour. If it is simmering cook on low foe the last hour. Top with cheese and serve.
I served this with a big salad and some home made Caramelized onion sourdough bread. My son dipped his ham and cheese sandwich in his soup and then ate the meat and dumped it in his lap. I didn't even cry. My daughter, husband, mom and myself all thought it turned out very well. It was very very close to the soup Olive garden makes.
You should make this. It is pretty darn good. It is filling enough to stand on its own I think, but I like to force my family to eat veggies when ever I can. If you like your soup to be thicker you can add 2 tablespoons of flour at the beginning and stir it really well.
I hope you enjoy it. It is even better the next day.
Just for some drool worthy picture....
The bread was amazing, and even the kids liked it. I can share the recipe if anyone is interested.
I was not good about taking pictures today. I went to a few different stores and just sort of hung out. Then I remembered my family thinks I need to feed them every day.... Seriously, it's like I am the mom or something.
My husband asks me what is for dinner sometimes. I am thinking about printing this, framing it, and hanging it in my kitchen.

That is how I felt today. That is how I feel every day. MWAHAHAHAHAHA Anyway. Even though I was bad and took almost no pictures I think it is pretty easy anyway. It is super. And I used ground beef that I cooked the other day and froze. I like to do that because then I have all sorts of stuff to make dinner easier when I have no idea what to make and I need something fast. Pre cooked ground beef is awesome if you want to make pasta, or pizza, or even sloppy joe's, or this soup.
What you need:
2 cloves minced garlic
2 cups chopped Kale or Swiss Chard
2 cans Chicken Broth
1 qt. Water
1 cup Heavy Whipping Cream
1 lb. Italian Sausage or ground beef cooked and drained.
2 large Russet Baking Potatoes sliced in 1/4 inch slices
1 chopped large Onion
1 small bag of Real Bacon Bits
grated Parmesan cheese.
Salt and pepper to taste
What you do:
Slice your potatoes and place them in your crock pot. Add your garlic and onion then the water and broth. Cook on low for 6-8 hours or high for 4-5. The last hour add your bacon bits, whipping cream, and kale. Turn on high and cook for the last hour. If it is simmering cook on low foe the last hour. Top with cheese and serve.
 | |
| The first step in the crock, at the beginning. |
 |
| The end result. I like it a little more spicy so I added red pepper flakes. |
You should make this. It is pretty darn good. It is filling enough to stand on its own I think, but I like to force my family to eat veggies when ever I can. If you like your soup to be thicker you can add 2 tablespoons of flour at the beginning and stir it really well.
I hope you enjoy it. It is even better the next day.
Just for some drool worthy picture....
 |
| The caramelized onion whole wheat sour dough bread. |
Monday, January 9, 2012
I find myself making all sorts of things from scratch. Help me!
So, I do not have a full time job. Aside from being a mom. So I feel like I should be extra vigilant and make the time to do a lot of stuff by hand. I do ALL of our baking. I make our own cheese crackers, and most of the snacks we eat. I need someone to help me.
However, I hate to be tied to my kitchen ( or house) all of the time. So I have some labor saving devices. The best thing I can suggest to do to do all of the cooking and still have a life is to do extra when you can and to buy a few cool kitchen gadgets. One of my absolute favorites is the bread maker. I have probably only made 3 loafs of bread from start to finish in it. I hate the way the loaves are shaped and the hole in the bottom. I have issues. BUT I can set it to mix and knead my bread and it is warm so the bread will rise, no matter how cold my house is.
You can almost always find them in in thrift stores. If you find one there ask to plug it in and set it to dough. Watch it for maybe 5 minutes and see if the paddle starts moving. I have seen them as low as 3 dollars.
I started making bread for my family and my daughter said it was too tough. So, I made up my own recipe for a sandwich loaf. It looks hard, but I promise... it is not.
What you need:
1 cup warm water
1 tablespoon milk
1 teaspoon salt
2 tablespoons brown sugar
2 tablespoons oil or softened butter
2 tablespoons honey
a sprinkle of ground ginger
a TSP oj
3 tsp flax seed gel 1 tbls of ground flax and 2 bls of water ) OR one egg beaten
3 cups flour... half w/w half bread flour
2 cups of starter (or 2 tsp of yeast)
*optional* a half cup of wheat berries
So you add all of your liquid ingredients and salt into your bread maker. Then add your sugar, ginger, wheat berries if you use them, egg, and flour. Make a well into the flour and add your yeast. Set your bread machine to dough and walk away for five minutes. In five minutes come back and look at the dough. If needed take a spatula ( rubber) and push stuff from the sides. Then let it finish up. The rest of the instructions are after the next paragraph.

BUT WAIT!!! I DO NOT HAVE A BREAD MACHINE! WHAT DO I DO!?
Well, think about getting one. But while you are thinking you can do it by hand. Mix all of your liquid ingredients in a big bowl ( or mixer if you have one) Then add your others and your dry ingredients. If you use a mixer use the dough paddle. If you are doing it by hand I find using a sturdy fork works best. After you get everything mixed either switch to your dough hook, OR dump your dough out on a well floured surface and knead it for at least 20 minutes. Call it some names, and wish you already had a bread maker. Cuss it some more and knead it for up to another 20 minutes if it is not where you need it to be. You may need to add in more flour. Your consistency should be a little sticky. Place in an oiled bowl and cover with plastic. Let proof for 1 hour in a warm place. Read on. The rest goes for all methods.
After you have your dough run through the dough cycle and the machine is beeping at you like some lost child that needs attention NOW ( or you have mixed and proofed it by hand/ mixer) punch down dough a few times to deflate it some. Have a loaf pan you have greased and floured ( or use corn meal) OR use pam or bakers secret.

Shape your dough into a loaf, or just dump it in like I do. Oil the top if the loaf, and make a slit in it. Cover with plastic, and allow to sit about 45 minutes in a warm place. I usually just turn the oven light on and shut the door.
At the end of that 45 minutes pull it out and preheat your oven to 350. Bake in for 35 minutes. (Tent loosely with foil after 20-25 minutes if loaf is browning too quickly.) When bread is done let sit for 5 minutes then remove from pan, place on a cooling rack, and cover until cool. Seal in a bag or container after cooled.

My mom is in town. I will be getting her help and input on recipes. I have not seen her in over a year, and I am so excited she is here. So my dears, I am out of here. I am gonna go hang out with my mom. Have a great night! Tomorrow I will make sourdough with caramelized onions for the hubbs.
However, I hate to be tied to my kitchen ( or house) all of the time. So I have some labor saving devices. The best thing I can suggest to do to do all of the cooking and still have a life is to do extra when you can and to buy a few cool kitchen gadgets. One of my absolute favorites is the bread maker. I have probably only made 3 loafs of bread from start to finish in it. I hate the way the loaves are shaped and the hole in the bottom. I have issues. BUT I can set it to mix and knead my bread and it is warm so the bread will rise, no matter how cold my house is.
You can almost always find them in in thrift stores. If you find one there ask to plug it in and set it to dough. Watch it for maybe 5 minutes and see if the paddle starts moving. I have seen them as low as 3 dollars.
I started making bread for my family and my daughter said it was too tough. So, I made up my own recipe for a sandwich loaf. It looks hard, but I promise... it is not.
What you need:
1 cup warm water
1 tablespoon milk
1 teaspoon salt
2 tablespoons brown sugar
2 tablespoons oil or softened butter
2 tablespoons honey
a sprinkle of ground ginger
a TSP oj
3 tsp flax seed gel 1 tbls of ground flax and 2 bls of water ) OR one egg beaten
3 cups flour... half w/w half bread flour
2 cups of starter (or 2 tsp of yeast)
*optional* a half cup of wheat berries
So you add all of your liquid ingredients and salt into your bread maker. Then add your sugar, ginger, wheat berries if you use them, egg, and flour. Make a well into the flour and add your yeast. Set your bread machine to dough and walk away for five minutes. In five minutes come back and look at the dough. If needed take a spatula ( rubber) and push stuff from the sides. Then let it finish up. The rest of the instructions are after the next paragraph.

 |
| See the well for my yeast? |
 |
| There is the yeast. It looks like tiny rocks. That makes me laugh. |
 |
| just set it and walk away!!well for 5 minutes |
 |
| See how it is not all mixed? Just scrape it down with a rubber spatula. |
 |
| It should look like this. |
BUT WAIT!!! I DO NOT HAVE A BREAD MACHINE! WHAT DO I DO!?
Well, think about getting one. But while you are thinking you can do it by hand. Mix all of your liquid ingredients in a big bowl ( or mixer if you have one) Then add your others and your dry ingredients. If you use a mixer use the dough paddle. If you are doing it by hand I find using a sturdy fork works best. After you get everything mixed either switch to your dough hook, OR dump your dough out on a well floured surface and knead it for at least 20 minutes. Call it some names, and wish you already had a bread maker. Cuss it some more and knead it for up to another 20 minutes if it is not where you need it to be. You may need to add in more flour. Your consistency should be a little sticky. Place in an oiled bowl and cover with plastic. Let proof for 1 hour in a warm place. Read on. The rest goes for all methods.
After you have your dough run through the dough cycle and the machine is beeping at you like some lost child that needs attention NOW ( or you have mixed and proofed it by hand/ mixer) punch down dough a few times to deflate it some. Have a loaf pan you have greased and floured ( or use corn meal) OR use pam or bakers secret.

Shape your dough into a loaf, or just dump it in like I do. Oil the top if the loaf, and make a slit in it. Cover with plastic, and allow to sit about 45 minutes in a warm place. I usually just turn the oven light on and shut the door.
 | |
| See how shiny it is with the oil? |
 |
| covered and ready to proof for about 45 minutes. |
At the end of that 45 minutes pull it out and preheat your oven to 350. Bake in for 35 minutes. (Tent loosely with foil after 20-25 minutes if loaf is browning too quickly.) When bread is done let sit for 5 minutes then remove from pan, place on a cooling rack, and cover until cool. Seal in a bag or container after cooled.

 |
| It didn't rise as much as it normally does. I think I need to get new yeast. Anyway, it smells HEAVENLY!!! |
My mom is in town. I will be getting her help and input on recipes. I have not seen her in over a year, and I am so excited she is here. So my dears, I am out of here. I am gonna go hang out with my mom. Have a great night! Tomorrow I will make sourdough with caramelized onions for the hubbs.
Sunday, January 8, 2012
Why I make a big breakfast most weekends. Bacon molasses pancakes.
First, let me apologize for not posting Friday or Saturday. Friday was my husbands command Christmas Party. In January. Gotta love the military. hahaha So I fed the kids left over Indian beans and rice and we ate what they were serving at the party. But I looked pretty great!!!!
We had a good time. It is always fun to go get all dressed up,go out, and act like a grown up.
Saturday morning I got up and I always cook a real breakfast on the weekends. This weekend I did Bacon molasses pancakes, and scrambled eggs with cheese. My kids were in heaven. I also gave them yogurt and fresh fruit.
Here is how you do it.
2 cup self rising flour
2 tsp cinnamon
2 tbls honey
1 tbls mollasses
2 c milk
2 eggs
1/2 cup apple sauce
2 tsp vanilla
4 slices bacon cooked crispy or 1/2 cup 100% bacon bits.
1 cup pecans ( I smacked mine with a rolling pin so they were not halves. )


Mix dry ingredients then add honey molasses eggs, applesauce, and milk. Mix until large lumps are gone. Cook on a griddle for about 2 minutes or until bubbles start to form. Then flip and cook another 2 minutes or so.

You can safely half this recipe. I like it because it makes a bunch of pancakes. After they cool I spread parchment paper on a cookie sheet and freeze them. Then after 2 hours I toss them in a large freezer bag and we have pancakes for weekday breakfasts. I also make a ton of muffins when I make those and freeze them in the same way.
Your kids, and husband will LOVE this breakfast. I like it too, but I just do not eat much in the way of breads. You know it is a hit when your 3 year old sits there and yells for more "cake and gurt" My tiny 7 year old even ate seconds, and thirds. yep.
Sorry I didn't post this Saturday. I was so busy enjoying my kids playing outside I didn't get around to doing so. Tomorrow I will be cooking more again. The weekend was just too nice to sit inside, and they I fell asleep on the couch. Getting old sucks MWAHAHAHA!
I had someone tell me that I was fat the other day... I wanted to cry, slap that man, or just laugh. What I did was come home and go through some clothes I can not wear because I am healthier now. Sometimes I get so upset when people are jerks. I hate to admit this. But I did buy myself an elliptical trainer so I can work out in my home and not be so big. Will I ever get back to that? HELL NO!! But I still get freaked out by the prospect. Here you go. Also, rude comments will be deleted.

We had a good time. It is always fun to go get all dressed up,go out, and act like a grown up.
Saturday morning I got up and I always cook a real breakfast on the weekends. This weekend I did Bacon molasses pancakes, and scrambled eggs with cheese. My kids were in heaven. I also gave them yogurt and fresh fruit.
Here is how you do it.
2 cup self rising flour
2 tsp cinnamon
2 tbls honey
1 tbls mollasses
2 c milk
2 eggs
1/2 cup apple sauce
2 tsp vanilla
4 slices bacon cooked crispy or 1/2 cup 100% bacon bits.
1 cup pecans ( I smacked mine with a rolling pin so they were not halves. )


Mix dry ingredients then add honey molasses eggs, applesauce, and milk. Mix until large lumps are gone. Cook on a griddle for about 2 minutes or until bubbles start to form. Then flip and cook another 2 minutes or so.

 |
| On the griddle watching for bubbles |
 |
| See the bubbles. The edge should start to pull up from the pan too. |
 |
| OOPS I burnt one a tiny bit trying to get pictures. But it still tasted amazing |
 |
| The fruit and yogurt didn't make the picture. |
You can safely half this recipe. I like it because it makes a bunch of pancakes. After they cool I spread parchment paper on a cookie sheet and freeze them. Then after 2 hours I toss them in a large freezer bag and we have pancakes for weekday breakfasts. I also make a ton of muffins when I make those and freeze them in the same way.
Your kids, and husband will LOVE this breakfast. I like it too, but I just do not eat much in the way of breads. You know it is a hit when your 3 year old sits there and yells for more "cake and gurt" My tiny 7 year old even ate seconds, and thirds. yep.
Sorry I didn't post this Saturday. I was so busy enjoying my kids playing outside I didn't get around to doing so. Tomorrow I will be cooking more again. The weekend was just too nice to sit inside, and they I fell asleep on the couch. Getting old sucks MWAHAHAHA!
I had someone tell me that I was fat the other day... I wanted to cry, slap that man, or just laugh. What I did was come home and go through some clothes I can not wear because I am healthier now. Sometimes I get so upset when people are jerks. I hate to admit this. But I did buy myself an elliptical trainer so I can work out in my home and not be so big. Will I ever get back to that? HELL NO!! But I still get freaked out by the prospect. Here you go. Also, rude comments will be deleted.
 | ||||||||
| 2 years ago. Before my Gastric Bypass. |

Thursday, January 5, 2012
Indian red beans and rice IN THE CROCK POT!!!!!
Today I asked my three year old what he would like for dinner. I gave him options and he picked red beans and rice. He turned down pizza for red beans and rice. He is not right. We all love Cajun food and I had been craving some Indian spices. So this is what I tossed in the crock pot. My crock is a 6 quart. This made a LOT of food. I will be freezing some of it most likely.
 2 cans red beans drained and rinsed
1 can coconut milk
1 can diced tomatoes.
3 cloves garlic (or 3 teaspoons pre chopped stuff)
2 med onions ( or one med and 3 green )
3 drops coconut extract
3 cups of chicken broth
1 package smoked sausage ( I only had cheddar wurst)
2 cups brown ( or white) rice ( I hear basmati is much better for this)
1 tsp Garam Masala
1 tablespoon pepper
1/2 tablespoon cayenne pepper ( adjust this to your preferred level of spice)
1 teaspoon salt ( I use iodized sea salt)
Mix all of the canned stuff in your crock.dump in your chopped veggies. Add your meat, and spices. Stir them up well, and add your dry rice stir well again.
Cook on low for about 8 hours
The kids absolutely loved this. They BOTH ate seconds. I added extra red pepper flakes to my serving and then some hot sauce. The hot sauce made it less indian flavored. Next Time I will use more Garam Masala. We served it with salad, and yogurt for dessert.

1 can coconut milk
1 can diced tomatoes.
3 cloves garlic (or 3 teaspoons pre chopped stuff)
2 med onions ( or one med and 3 green )
3 drops coconut extract
3 cups of chicken broth
1 package smoked sausage ( I only had cheddar wurst)
2 cups brown ( or white) rice ( I hear basmati is much better for this)
1 tsp Garam Masala
1 tablespoon pepper
1/2 tablespoon cayenne pepper ( adjust this to your preferred level of spice)
1 teaspoon salt ( I use iodized sea salt)
Mix all of the canned stuff in your crock.dump in your chopped veggies. Add your meat, and spices. Stir them up well, and add your dry rice stir well again.
Cook on low for about 8 hours
 |
| This turned out so amazing!! |
The kids absolutely loved this. They BOTH ate seconds. I added extra red pepper flakes to my serving and then some hot sauce. The hot sauce made it less indian flavored. Next Time I will use more Garam Masala. We served it with salad, and yogurt for dessert.
Wednesday, January 4, 2012
Apple and bannana chips
I have not been feeling well yesterday and today, but I know I need to feed my family anyway. Thankfully I still had some leftovers from the noodle free pasta from 2 days ago. I did decide to break out my newest kitchen toy. My mom got me a food dehydrator for Christmas. I decided to go ahead and start the process for apple and banana chips today. Healthy snacks are always something I try to keep on hand.
I like to make my own because I know that there are no additives that I do not want and I know how healthy it is. Also, it saves us some money. I used 4 apples and I started with 3 bananas. However, I think probably only 2 got used. I am not sure and there is no way to tell how much banana a hungry 3 year old shoved in his mouth while I was slicing. This kid LOVES bananas.
I cored and sliced up four apples. The slices were around 1/4 inch thick. I treated the slices with about 30 minutes in a ball treatment and water bath ( but lemon juice works just as well) so they would not get too dark. Then I patted them dry and sprinkled with splenda and cinnamon. Toss them on for about 8 to 10 hours and when they are crispy they are done.


As for the bananas I sliced them into 1/4 inch slices. Then I made a mix of 1/4 cup water and 1/4 cup honey and I added 1/8 teaspoon of cinnamon ( that is optional though). Tossed the slices in the mixture, and scooped them out with a fork so most of the solution fell off. Placed them on a rack for about 10 hours.
This is a lot like cooking with the crock pot. I can fix it and walk away without having to mess with it much.
They are so good and so healthy. The minion love them and beg for "one more, please" when ever we have them. Today was a duty day, so I had very few dishes from meals. We always mess up so many more when we are all here. It worked out very nicely to have just a few dishes.

Notice how some are missing? That is because the minion were grabbing hand fulls as I was taking pictures.
Later this week I will be baking bread. So be watching for my post about why everyone should have a bread maker ( even though I never use it to bake the bread) and my special sandwich loaf recipe. I am going to go snuggle with the minion. I hope you all have a great day.
I like to make my own because I know that there are no additives that I do not want and I know how healthy it is. Also, it saves us some money. I used 4 apples and I started with 3 bananas. However, I think probably only 2 got used. I am not sure and there is no way to tell how much banana a hungry 3 year old shoved in his mouth while I was slicing. This kid LOVES bananas.
I cored and sliced up four apples. The slices were around 1/4 inch thick. I treated the slices with about 30 minutes in a ball treatment and water bath ( but lemon juice works just as well) so they would not get too dark. Then I patted them dry and sprinkled with splenda and cinnamon. Toss them on for about 8 to 10 hours and when they are crispy they are done.


 |
| Soaking in the water. |
 |
| Sprinkled with splenda and cinnamon. |
As for the bananas I sliced them into 1/4 inch slices. Then I made a mix of 1/4 cup water and 1/4 cup honey and I added 1/8 teaspoon of cinnamon ( that is optional though). Tossed the slices in the mixture, and scooped them out with a fork so most of the solution fell off. Placed them on a rack for about 10 hours.
 |
| What you need. |
 |
| Maybe 2 1/2 bananas ready to cook. |
This is a lot like cooking with the crock pot. I can fix it and walk away without having to mess with it much.
They are so good and so healthy. The minion love them and beg for "one more, please" when ever we have them. Today was a duty day, so I had very few dishes from meals. We always mess up so many more when we are all here. It worked out very nicely to have just a few dishes.

 |
| And they are all done!! YUMM |
Notice how some are missing? That is because the minion were grabbing hand fulls as I was taking pictures.
Later this week I will be baking bread. So be watching for my post about why everyone should have a bread maker ( even though I never use it to bake the bread) and my special sandwich loaf recipe. I am going to go snuggle with the minion. I hope you all have a great day.
Monday, January 2, 2012
GBS friendly Super low carb comfort food. Or how I get my kids to eat a weeks worth of veggies in one meal!
So, I had Gastric bypass about 2 years ago. I had gotten really big. I did it to be healthy for my kids and myself. It was truly the best thing I ever did for myself. Sometimes I hate what it has done to my eating habits. I miss comfort food. I miss being able to eat my fill of hot sourdough bread and soup. Italian food is my weakness, and I miss the heck out it. A surgery like that is supposed to be life changing. And it is. But.... no matter how many meetings you go to, no matter how ready you THINK you are... you are not. My biggest fear, and the source of all my nightmares ( except that freaky one about Freddy Kruger, the giant spider, and Pennywise the clown) is that I wake up one day and I look at myself and I have gained it all back, and then some. And in my dream it happened so slowly I didn't know it was happening until it was all there. You know what, I have seen it happen. A lot of people I know had the surgery and gained it all back about 3 or 4 years after they have the surgery.
Enough of what I am scared of. On to the food!! Tonight I wanted something comforting for dinner. I know my husbands deployment schedule for the year. While I am not complaining, and it is not nearly as bad as it could be.... I still get a little sad when I know how often he will be gone. Old me would have eaten home made bread and cookies. New me ...well I still want to eat the cookies and bread, but I am not a slave to those habits any more.
Tonight we made dinner as a couple. So I didn't get pictures of everything step by step. We made noodle free spaghetti casserole home made cheddar bay drop biscuits, and salad. NOODLE FREE "basketti" ( as the youngest minion calls it) is really easy to make, and lends itself to substitutions so you can make it with what you have in your house.
You need:
For the noodle free "pasta"
spaghetti squash
pound of sausage ( use any kind, I used hot sausage of the breakfast variety)
a good sized onion
2 green onions
4 zucchini or yellow squash ( either or a mix will be fine)
2-3 cloves or garlic minced ( or tsp of minced jarred garlic)
Can of tomoatos
jar of sauce
1 cup of cheese ( I used 3/4 cheddar and 1/4 Parmesan and Romano)
2 tbls panko bread crumbs
2 -3 tbls of olive oil ( or sunflower or whatever you use)
salt, pepper, and Italian seasoning to taste.
For the cheddar bay drop biscuits :
2 c of self rising flour
half cup of shredded cheddar
1 tlbs parsley ( I used dry)
1 tbls garlic powder
2 tbls butter
1/2 to 3/4 cups of milk
1 tbls melted butter
DO NOT GET OVERWHELMED! THIS IS WAY EASIER THAN IT SOUNDS
First cook your spaghetti squash. I didn't get pictures of that, but you can do it in the oven or the microwave. I did it in the oven by cutting it in half ( WARNING they are very hard on the outside, so BE CAREFUL) and scooping out the seeds. Then I baked it at 350 for 45 minutes in a jelly roll pan cavity side down with 1/4 cup water in the pan.
While that is baking grate up your squash/ zucchini. Cut your onions into what ever size your family will eat. Toss it all in a pan with your minced garlic, and sausage. Add your spices ( sorry, we all like things done in our own way). When your sausage is all browned open your can of tomatoes and sauce and mix in then lower your temp and simmer it while you finish the rest of the food.
Your spaghetti squash should be done by now. Pull it out and let it cool enough to touch. Start your buscuits while it cools ( recipe follows).
Take a fork and run it inside your squash and it will shred up like noodles. Crazy I know. Do with both sides and then toss with the oil and some salt and pepper. ( I do not know how much but I would say I used maybe 1 1/2 tsp salt and 1 tbls pepper) put it in a large casserole dish ( mine is 9 x 13) and mix with the sauce. set aside. Mix your shredded cheese and bread crumbs and sprinkle on top of the whole thing. Place into the oven that is still at 350 for 15-20 minutes ( however long it takes for your biscuits to be done).
Cheddar biscuits.
Mix your flour with your non melted butter ( have it softened) until it is a little crumbly. Then add garlic powder, cheese, and parsley. mix up and add your milk. It should be doughy, but not too dry. You can roll them out and cut them, but I don't want to waste the time. Drop them by the spoon full onto an ungreased cookie sheet. and slide into the oven with your "pasta". Bake for about 15 minutes and when they are done pull them out and brush with the melted butter. Let sit while you put the other stuff on a plate and in the fridge for your picky little kids who will not eat food that is "too hot" or "too cold" ( about 2 minutes) and then everything is ready to serve. I added some salad and called it a day.
The verdict: This was not something new. It is something I serve at least once a month. It is insanely healthy and my kids have no idea it is not really noodles. Everyone I have ever served it to loved it. Tonight My 3 year old who will throw ice cream, ICE CREAM!!, ate all of his and asked for more. The picky 7 year old asked if she can take some with her for lunch and the husband told me at least 10 times how much he enjoyed dinner ( both the making and the eating). Seriously guys, cook as a family, or a couple. It is so good for your relationship to do things together. You MUST make this!!
Enough of what I am scared of. On to the food!! Tonight I wanted something comforting for dinner. I know my husbands deployment schedule for the year. While I am not complaining, and it is not nearly as bad as it could be.... I still get a little sad when I know how often he will be gone. Old me would have eaten home made bread and cookies. New me ...well I still want to eat the cookies and bread, but I am not a slave to those habits any more.
Tonight we made dinner as a couple. So I didn't get pictures of everything step by step. We made noodle free spaghetti casserole home made cheddar bay drop biscuits, and salad. NOODLE FREE "basketti" ( as the youngest minion calls it) is really easy to make, and lends itself to substitutions so you can make it with what you have in your house.
You need:
For the noodle free "pasta"
spaghetti squash
pound of sausage ( use any kind, I used hot sausage of the breakfast variety)
a good sized onion
2 green onions
4 zucchini or yellow squash ( either or a mix will be fine)
2-3 cloves or garlic minced ( or tsp of minced jarred garlic)
Can of tomoatos
jar of sauce
1 cup of cheese ( I used 3/4 cheddar and 1/4 Parmesan and Romano)
2 tbls panko bread crumbs
2 -3 tbls of olive oil ( or sunflower or whatever you use)
salt, pepper, and Italian seasoning to taste.
For the cheddar bay drop biscuits :
2 c of self rising flour
half cup of shredded cheddar
1 tlbs parsley ( I used dry)
1 tbls garlic powder
2 tbls butter
1/2 to 3/4 cups of milk
1 tbls melted butter
DO NOT GET OVERWHELMED! THIS IS WAY EASIER THAN IT SOUNDS
First cook your spaghetti squash. I didn't get pictures of that, but you can do it in the oven or the microwave. I did it in the oven by cutting it in half ( WARNING they are very hard on the outside, so BE CAREFUL) and scooping out the seeds. Then I baked it at 350 for 45 minutes in a jelly roll pan cavity side down with 1/4 cup water in the pan.
While that is baking grate up your squash/ zucchini. Cut your onions into what ever size your family will eat. Toss it all in a pan with your minced garlic, and sausage. Add your spices ( sorry, we all like things done in our own way). When your sausage is all browned open your can of tomatoes and sauce and mix in then lower your temp and simmer it while you finish the rest of the food.
 |
| sideways, but good stuff. Some things didn't make the pic. |
 |
| just dump it on and stir to brown it all. |
 |
| Ok, the meat is cooked. Time for the tomatoes! |
 |
| make sure to have it simmer so all the flavors blend together |
Your spaghetti squash should be done by now. Pull it out and let it cool enough to touch. Start your buscuits while it cools ( recipe follows).
 |
| cooked and cooled. Time to shred |
Take a fork and run it inside your squash and it will shred up like noodles. Crazy I know. Do with both sides and then toss with the oil and some salt and pepper. ( I do not know how much but I would say I used maybe 1 1/2 tsp salt and 1 tbls pepper) put it in a large casserole dish ( mine is 9 x 13) and mix with the sauce. set aside. Mix your shredded cheese and bread crumbs and sprinkle on top of the whole thing. Place into the oven that is still at 350 for 15-20 minutes ( however long it takes for your biscuits to be done).
 |
| looks like spaghetti! Has an al dente feel to it. |
 |
| before I add the sauce and topping. |
 |
| mix your topping, and you can leave out the bread crumbs if you really want to. They are a nice addition. |
 |
| ready to melt the cheese. |
Cheddar biscuits.
 |
| milk didn't make the picture. |
Mix your flour with your non melted butter ( have it softened) until it is a little crumbly. Then add garlic powder, cheese, and parsley. mix up and add your milk. It should be doughy, but not too dry. You can roll them out and cut them, but I don't want to waste the time. Drop them by the spoon full onto an ungreased cookie sheet. and slide into the oven with your "pasta". Bake for about 15 minutes and when they are done pull them out and brush with the melted butter. Let sit while you put the other stuff on a plate and in the fridge for your picky little kids who will not eat food that is "too hot" or "too cold" ( about 2 minutes) and then everything is ready to serve. I added some salad and called it a day.
 | |
| ready to be baked. |
 | |
| while I was grabbing my camera some disappeared... |
 |
| everyone was a member of the clean plate club tonight! |
The verdict: This was not something new. It is something I serve at least once a month. It is insanely healthy and my kids have no idea it is not really noodles. Everyone I have ever served it to loved it. Tonight My 3 year old who will throw ice cream, ICE CREAM!!, ate all of his and asked for more. The picky 7 year old asked if she can take some with her for lunch and the husband told me at least 10 times how much he enjoyed dinner ( both the making and the eating). Seriously guys, cook as a family, or a couple. It is so good for your relationship to do things together. You MUST make this!!
Subscribe to:
Posts (Atom)